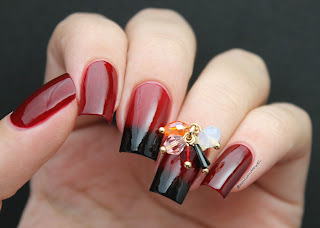
If vampires where cheerleaders, would these be their pompoms?
I bet yes ..
A challenging vampy gradient for today
Find the tutorial at the end of this post
Si las vampiros fueran porristas, sus pompones serian así?
Apuesto a que si ..
Un desafiante degrade estilo vampiro para el dia de hoy
Encuentra el tutorial al final de este post
To create the gradient I used these 3 colors..
"Manzana Fatal" is a dark red creamy shade, I also used it as the base for the gradient for being the lightest color of the 3.
"Campari" a deep dark bloody red shade, also used on my thumb, index and pinkie.
"Onix" the black one.
And because no gradient is meant do be done without any protection around the nails, I used for the first time a liquid tape / latex ..
Finally!! haha, You will see this in action on my tutorial
This is a liquid tape as said on the bottle. applies white but when it dries, turns completely clear.
Drying time is 2 min or less depending on how thick you apply it. But dries really fast.
Also, I've heard that these kind of latex smell weird, and they do..
This one do not have a strong smell on it, it only smells when is close to your nose but is not like your are going to stick it to your face right?
I would describe it like:
If someone would make a soap with fish then this is how it would smell..
Again the smell is not strong at all.. and that's a good thing.
Plus, does the job amazingly, no need to pay $12.00 dollars per bottle, when this one is the same thing and cost less than $3.00
The peel off tape is from Born Pretty Store
Item #22612
And remember that you can use my code '4AG10' to get a 10% off
Ya que ningún tipo de degrade debe hacerse sin la debida protección alrededor de las uñas, I use por primera vez un liquid tape / latex (tape liquido / latex)
Al fin!! jaja.. Lo verán en mi canal de youtube.
Este es un 'liquid tape' como lo dice en la botella, se aplica blanco pero cuando se seca es totalmente transparente.
Seca en 2 minutos o menos, dependiendo de que tan grueso lo hayas aplicado, pero por lo general seca rápido.
Tambien, escuche que algunos de estos tipos de latex tienen un olor fuerte, y es verdad.
Este de aquí no tiene un olor tan fuerte, solo se siente cuando esta cerca de la nariz y no es que vallas a pegartelo en la cara, verdad?
Lo describo así:
Si hacen un jabón con pescado, así seria este olor.
Pero como les dije, su olor no es fuerte, se siente muy poco y eso es bueno.
Mas, hace el trabajo de maravilla, no tienen que pagar $12.00 dolares por una botella, cuando este hace lo mismo y les cuesta menos de $3.00 dolares..
Este de aqui es de Born Pretty Store
Articulo #22612
Y pueden tener un 10% de descuento usando mi código '4AG10'
Topcoat:
"Super Shine"
Sally Hansen
Now, let's go to the pompom ..
I saw it a few months back on Daily Charme and I knew I had to get it!! .. So I waited until they made a good 20% off =D
This one is called "April" there are 4 different
And I know a lot of you would say.. Oh this is too big. I know..
Is enormous for being just a charm but just look at it, is GORGEOUS!
I recommend it for big and very long nails.
It is like a bracelet for the nail xD
Ahora vamos al pompom..
Lo vi unos meses atrás en Daily Charme y sabia que tenia que comprarlo! .. Espere hasta que hicieron una buena oferta del 20% =D
Este se llama "April" hay 4 diferentes.
Yo se que muchas dirán.. Oh pero es muy grande. Yo se..
Es enorme para ser un simple charm de uña pero solo mírenlo, es HERMOSO!
Lo recomiendo mas para uñas largas y grandes..
Es como una pulsera para la uña xD
It has that curved back and that part is the one to stick to the nail and not the rest of the gems.
This is the only charm that you want to wait your nail to fully dry before you stick it.
What I did was to let it dry of course, then added a drop of topcoat where I wanted, and carefully placed the charm sticking that curved back on the nail.
Este tiene una parte curva que es la base del charm y esto es lo que se pega en la uña y no las piedritas que tiene.
Este es el único adorno que quieres esperar que tu uña este completamente seca antes de pegarlo.
Lo que hice fue dejar secar, claro, y luego coloque un poco de topcoat donde quería, y cuidadosamente coloque el adorno pegando la parte curva en la uña.
TUTORIAL:


No hay comentarios.:
Publicar un comentario