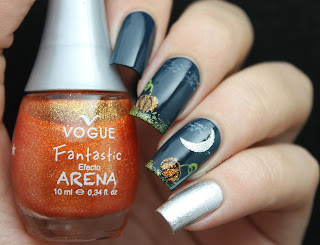
I just wanted to make a night scene with some pumpkins..
And when I finished it, for some reason, it reminded me of Charlie Brown.
It is an Autumn night with the clear sky showing a beautiful moon, some pumpkins..
And there you have it.. "It's the great pumpkin, Charlie Brown"
Tutorial at the end of this post
Solo queria hacer una noche con algunas calabazas..
Y cuando termine, por alguna razon, me recordo a Charlie Brown.
Es una noche de otoño con un cielo despejado mostrando una hermosa luna, algunas calabazas..
Y ahi lo tienen.. "Es la gran calabaza, Charlie Brown"
Tutorial al final de este post
The base color is "Neptuno" - Vogue Fantastic.
Is a creamy navy blue shade.
I needed 3 thin coats to get it opaque.. Normally I would use 2, but when the polish is new the formula comes thinner..
El color base es "Neptuno" de Vogue Fantastic.
Es un esmalte azul naval cremoso.
Necesite 3 capas delgadas para que fuera completamente opaco.. Normalmente usaria 2, pero cuando el esmalte es nuevo, la formula tiende a ser mas delgada.
On my pinkie nail I did 2 coats of "Radiance" - OPI.
En el meñique use 2 capas de "Radiance" de OPI.
To make the scene:
I used that shimmery green shade for the grass, I used a makeup sponge to apply the polish just on the tip of the nail..
The white I used it for the subtle clouds, also made with a makeup sponge.
For the pumpkins and the moon I used vinyls from Snail Vinyls and made some decals.
I used "Fuego" a textured orange polish for the pumpkins, the light green for the stem and black for the details.
And "Radiance" same silver mentioned before for the moon.
Para la escena:
Use ese verde con brillo para el pasto, use una esponja de maquillaje y lo aplique en la punta de la uña.
El blanco lo use para esas nubes tan sutiles, tambien use una esponja de maquillaje.
Para las calabazas y la luna use platillas de Snail Vinyls e hice unas calcomanias.
Use "Fuego" un esmalte texturado naranja para las calabazas, el verde claro lo use para el tallo y negro para los detalles.
Y "Radiance" el mismo plateado mencionado para la luna.
I did 2 coats of topcoat on the middle and ring finger nail to make all these smooth and shiny, mostly because I was using a textured polish.
"Super Shine" - Sally Hansen
Yo use 2 capas de topcoat en las uñas del medio y anular para dejarlo bien liso y brillante, mas porque usaba esmalte texturado.
I really loved how these came out, I don't want to take them off!
These are just too cute..
Halloween nails do not need to be creepy, at least not every time ;)
Me gusto mucho como me quedaron estas, no me las quiero quitar!
Es que se ve muy tierno..
Diseños de Halloween no tienen que ser espeluznantes, bueno no siempre ;)
Tutorial:
There are 3 tutorials in 1 video, the tutorial for this one is the 3rd!
I guess that's it
Hope you like this one
Creo que es todo
Espero les guste


No hay comentarios.:
Publicar un comentario